Welcome!

Welcome to the forum for collectors, restorers and fans of flip clocks. Please Sign Up if you would like to take part.

By the way, signing up is free..

Announcement

Collapse
No announcement yet.

1970 Sony Digimatic Litetime AM/FM Clock Radio Model TFM-C770W Non-Functional Clock

Collapse
X
 
  • Filter
  • Time
  • Show
Clear All
new posts

    1970 Sony Digimatic Litetime AM/FM Clock Radio Model TFM-C770W Non-Functional Clock

    Greetings everyone, I was sent over here by the NAWCC Forum regarding my Sony Digimatic issues, and a possible way to repair/rectify the issues.
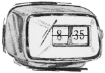
    On Sunday I acquired a Sony Digimatic Litetime (blacklight) Clock Radio that was actually one of the models I was looking for for a long time and I got it for a good price (under $50), but when I got it home and went to plug it in and try it out I realized the clock mechanism wasn't working and so I went to take it apart to see what kind of motor it used so I could see if it was something I could fix, and sure enough it was a Telechron style motor (I thought it was an actual Telechron rotor, because Sony did use some Telechron rotors in some of their alarm clock radios that had the analog clock dials on them) but no, it turned out to be an Omron made unit that was Based on the Telechron "S" Series rotors (apparently Omron must of paid for the patent rights to use the Telechron rotor design) and so the old Telechron rotors I had on hand wouldn't work with this unit.

    I tried to see if I could "free-up" the rotor to make it functional again by dribbling some 30 wt non-detergent oil onto the output shaft of the rotor and gently turning the output shaft with a pair of pliers but I ended up stripping out one of the gears in the rotor in the process, when instead what I probably should of done was drilled a hole into the top of the rotor housing and dribbled the oil in directly into the rotor housing and let it sit for a while and then tried to rotate the output shaft.

    I have heard through various sources that this particular alarm clock radio's motor/rotor assembly was very problematic and tended to seize up often, and that there was other variations of this motor/rotor combination over the years that weren't as troublesome as the original iteration of the motor.

    Has anyone been able to find a proper fix for this particular alarm clock yet or a replacement motor that would work as a direct drop-in replacement?

    Thanks for your help.

    Levi

    #2
    Levi,

    When I attempted to revive one of these using a similar method it did not go well, and I stripped the internal gearset. I too tried drilling into it, but I didn't do enough research and I ended up piercing one of the components.

    Long story short, I ended up finding a good used motor (Omron rotor, I used my existing coil) from a FlipClockFan community member and then sold the clock on. Wasn't something I wanted to deal with at the time, plus they are BEHEMOTHS and much too large for a modern nightstand! Still, they are very cool clocks and whenever I see one I do miss mine a bit. They also have excellent radios, one of the best I've heard in that form factor.

    Comment


      #3
      Instead of drilling I would try open up the case. This may be difficult to do, but is possible (at least with Sankyo, Tamura and Toshiba motors, so I hope also with this Omron).

      First step is to scrape/chip away the seal that keeps the lid in place (I heard a corkscrew is a good tool but did not yet try that). Make sure that the inside of the can is absolutely clean to prepare for the next step.

      Then comes the big trick: tap the edge of the case with the end of a screwdriver or something alike, going round and round in circles. The reaction to the shock will make the inside of the motor slowly move towards the edge of the case.
      Click image for larger version

Name:	P1020351.jpg
Views:	225
Size:	142.6 KB
ID:	29032

      Once at the edge of the case you should be able to pull the lid out.

      Here are two posts on this kind of repair:
      Recently I got a Sankyo 432 that was not running. This has the Telechron like sealed can field coil motor, like many other Sankyo clocks (see this list (https://www.flipclockfans.com/forum/forum/clock-show-and-tell/clock-restoration-and-repair/19215-sankyo-clock-motor-list)) as well as other clocks that use the Sankyo

      The Sankyo “sealed can / Telechron style” motors are known to be unreliable and hard to repair. They often stop working due to old dried out lubrication or a broken gear. Earlier I did already find out how to open up this type of motor for service, see: Sankyo sealed can motor repair (https://www.flipclockfans

      Note: there is no need to seal the can after the repair (I did that once but it is not needed and it makes it only more difficult if you later need to open it up again).

      Comment


        #4
        Thanks for all the tips I'll keep those in mind!

        I did find another clock radio like this one on feebay for $20 that has the same issue (seized up motor but working radio) and I'm going to try and see if I can get the motor running from that one using the tips I've heard from you guys so far, and give an update.

        Comment


          #5
          I got the parts clock in the mail yesterday (Saturday November 4th) and I took the motor out of that clock and I drilled a small hole into the top of the motor housing and sprayed some liquid wrench into the motor housing to clean out any old lubricant out of the motor and blew it out with compressed air and then dribbled in some fresh 30 wt non-detergent oil into the motor housing through the hole I drilled into the motor housing and gently rotated the output shaft of the motor and I was able to successfully free up the motor and getting going again without stripping out any gears.

          Now I just need to reseal the motor housing using some sort of epoxy to seal up the hole I drilled into the case (I tried to use solder but the solder wouldn't stick to the aluminum housing for some reason even though solder was used on aluminum wiring back in the day when wiring up point to point wiring on old tube radios.)

          Comment


            #6
            Thanks for the follow up. Interesting information that should help out others messing around with these models.
            ~ Mackey Site Administrator
            If you have any questions/comments Contact Me
            If you're not a member, you should consider joining!

            Comment


              #7
              Thought I'd share my odyssey with my TFM-660W roller clock. As others have mentioned, this is not one of Sony's best clock radio efforts. The motor is problematic, the original black light bulbs have almost certainly faded out by now and the whole unit is huge for a bedside table. I didn't know any of this when I bid on an eBay listing last summer. It was cheap, I am a Sony fan and I thought it would be an interesting project.

              I won it for cheap but it was poorly packed and suffered damage in shipment.

              Click image for larger version

Name:	IMG_4888_sm.jpg
Views:	127
Size:	329.2 KB
ID:	29153

              Despite the damage, the radio still functioned and the seller agreed to a refund so I decided to see what I could do with it. I was able to super glue the case back together and repair the tuner shaft but it was never going to be a restoration candidate. Next step was to see if I could get the clock running. Apparently there were at least a couple of different versions of the motor used with the Omron motors reported to be particularly problematic. Fortunately (?), the motor in my unit is a Tamura and ran fine after lubricating. The bushing that centered the motor axle had disintegrated so I modified a wire nut (!) as a replacement. Not pretty but it works. It's actually now quite quiet and runs great.

              Click image for larger version

Name:	IMG_0506_sm.jpg
Views:	133
Size:	223.0 KB
ID:	29154
              Click image for larger version

Name:	IMG_0516_sm.jpg
Views:	130
Size:	256.6 KB
ID:	29155

              At this point, the clock and the radio both worked well but it was butt ugly. I had to decide how much more time and money I wanted to put into this thing.

              I was curious how the black light would look so decided to try the LED replacement light strips and to paint the yellowed, cracked up case a dark charcoal. I ordered a cheap UV LED black light strip and an LED driver on eBay and picked up a can of plastic compatible automotive spray paint at my local auto parts store.

              The power supply was too big to squeeze into the case so I cut open the case with a dremel tool and found a place to squeeze in the bare board. I removed the original black light tube and wiring and mounted the LED strip to the original light PCB.

              Click image for larger version

Name:	IMG_0519_sm.jpg
Views:	129
Size:	259.0 KB
ID:	29158
              Click image for larger version

Name:	IMG_0517_sm.jpg
Views:	129
Size:	309.0 KB
ID:	29157

              Painting the case was pretty straightforward. I think the LED black light is actually a bit too bright for a bedroom but it's fine in my office where it's very easy to read from across the room. The radio is actually very good with great sensitivity and tone. I'm glad I didn't just dump it into the trash.

              Click image for larger version

Name:	IMG_0524_sm.jpg
Views:	127
Size:	144.0 KB
ID:	29160
              Attached Files

              Comment


                #8
                OK, so I now have an update for my Digimatic Clock Radio: Its going on almost a half a year now since I repaired the motor in my alarm clock and its still humming along (literally and figuratively) the clock is keeping excellent time and while it is somewhat noisy it isn't nearly as bad as I was expecting it to be.

                So here's what I did:

                1) I drilled a hole in the top of the motor housing dribbled in some 30 wt non-detergent motor oil into the motor housing, and let it soak in for a few minutes.

                2) I then carefully with a pair of pliers rotated the motor shaft CCW and then CW until the motor shaft freed up being careful not to strip the gears inside the motor housing.

                3) I then sealed up the hole I drilled into the rotor housing with some heat-resistant silicone sealant and installed the step-up gear onto the rotor shaft.

                4) I then reinstalled the motor assembly back into the clock mechanism and plugged in the clock and tested it for action and sure enough the clock was running again.

                Hopefully this will help others down the road who come across one of these clocks with the Omron (Telechron-like) rotors.

                Interestingly enough my clock's Blacklight tube is still mostly visible yet, the only part that isn't visible anymore is the part that shines over the date readout, but the day readout and the time readout are still visible yet.

                I think you can still get new Blacklight tubes yet like what this uses, you would have to go to Mouser or Digi-Key to source them though, because I think they still use them for the blacklight based counterfeit dollar bill lights that banks and stores use to make sure no one is passing off phoney $50 or $100 bills.

                Comment


                • teehee34
                  teehee34 commented
                  Editing a comment
                  Hi...I just bought one of these clocks and possibly the same issue. I am assuming you had to take the clock totally apart to get this done? My friend is an electrical engineer and we removed the casing and determined that the motor is the issue, as it is not turning the shaft. Not sure if he has the ability to take the whole clock apart and re-assemby (or the desire, as it isn't even his clock). Wish you lived down the street from me, as it is such a great clock and hate to see it not working. It is even the rare orange colour! Thanks for your tips!
              Working...
              X