Welcome!

Welcome to the forum for collectors, restorers and fans of flip clocks. Please Sign Up if you would like to take part.

By the way, signing up is free..

Announcement

Collapse
No announcement yet.

A replacement for the first gear in a Copal motor

Collapse
X
 
  • Filter
  • Time
  • Show
Clear All
new posts

    A replacement for the first gear in a Copal motor


    The most common failure in a Copal motor is the first gear, the plastic gear connecting to the brass gear on the rotor axle. This one wears out first, because it makes the most revolutions.
    Usually we replace it with a gear salvaged from another broken motor (or replace the motor, if that is easier).
    Recently I found kkpmo.com, a Polish manufacturer of gears for model cars, trains, etc. that can make gears to measure. So I thought I give it a try and repair a motor using these gears.

    Quick conclusion:
    Is it possible? Yes! I fixed two motors, one from a Copal AP-110 and one from a Copal 602.
    Is it easy? Not really. These gears are very, very small. But with the right tools and a steady hand it can be done.

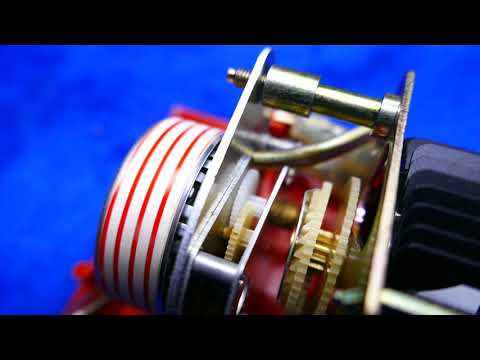
    Here are the old, the new and the parts for the Copal AP-110 motor:

    Click image for larger version

Name:	P1020696.jpg
Views:	609
Size:	266.9 KB
ID:	22869

    And here it is in action:


    And now in detail:

    Step 1: order the gears

    You need two gears, one with 10 teeth and the other with 40 teeth, both module 0.25 (M0.25).
    You can order them here: https://shop.kkpmo.com/index.php?cat...8f483kcvldelk3
    Drill hole diameter: 1.0 mm (maybe 1.2 would work, but I did not dare to try).
    Width of the 40 teeth gear: 1.0 mm.
    Width of the 10 teeth gear: 2.5 mm (but better check yourself as this may differ per motor).

    For the material you can choose POM or brass. I used POM as I thought it would be easier to work with (and the original was plastic), but as you can read below the difficulty glueing, I’m now in doubt. Would brass be better? Not sure…

    The cost is about 3 euro per gear and 6.15 euro shipping worldwide.
    I got hem about 3 weeks after ordering (there is no tracking provided, just be patient).

    The quality is flawless! They measure exactly as requested and fit perfectly to the the other gears in the motor.

    Step 2: correct the bore diameter

    I ordered the gears with 1.0 mm bore while the axis diameter is around 1.1 to 1.2 mm diameter. So you need a 1.1 or 1.2 mm drill and probably also a very small needle file. I did not have such a small file at hand, so I improvised one from a paperclip. I straightened the paperclip and then roughened it up by firmly rolling it between two large flat files.

    Step 3: glue the two gears together

    This step I’m struggling with.
    The plastic used, Polyoxymethylene (POM), is very difficult to bond. I used superglue, and that worked, but with difficulties. For a good alignment I found it necessary to place the gears on the axis, but then too easily you also glue the gears to the axis. Lightly oiling the axis helped a bit to prevent this, but then you have to be careful not to get the oil on the contact surface. Another problem is that the glue is very fluid and capillary forces easily draw it into the teeth of the small gear, so use as little as possible. (It does not bond very well to the plastic it is easy to remove it afterwards using a needle, but it’s all extra work.)

    Step 4: create spacers if needed

    For one motor I created a spacer from scrap plastic (see photo above), for the other I reused part of the old gear. Later I found that you can also buy “micro shaft sleeves” from the same site.
    Note that there is no need to attach them to the gears.

    All and all I’m happy with the result! The method of glueing the gears needs improvement, the rest is fairly easy. I still have material for three more gears, so let’s see what a little practice will bring.


    #2
    This is very good stuff Johan and also good to know that gears are a good match! I don't see 3D printing (and scanning) in such a small size coming up to scratch any time soon so alternatives are welcome.

    I will be ordering some of these gears. I guess I would try to use 2 component adhesive for it takes a long time to dry, but it might still stick to the shaft.

    On a different note, using brass might be an idea, but how do you combine the two gears together and would using brass not potentially destroy the next gear for the teeth might be too sharp?

    Comment


      #3
      Excellent work Johan!

      It’s great to see a working solution to the first gear failure. I know that took a lot of effort and persistence to put that all together. The post is great with the working gear in the video.

      thanks for sharing this

      Comment


        #4
        This works. I got the gears from Poland yesterday. I did change one dimension from 2.5mm to 3mm. I used mini files and opened the holes by hand. and used gel super glue to join them. it works very well and was relatively easy. another flip clock back in service. and more to come now Thank You Johan you're the best!

        Comment


          #5
          Thanks for that feedback Tony. I just placed an order for a bunch of them, including the sleeves... Will update here once I have used them.

          Comment


            #6
            When I ordered the small gear 3mm tall I thought there would be no need for spacers. I was right. so no spacers in my case. I also used small Dremmel bits but turning them with my fingers no power. I did not use a drill bit.
            Click image for larger version

Name:	CIMG0444.jpg
Views:	561
Size:	468.8 KB
ID:	23034

            Comment


              #7
              Just succesfully repaired another gear.
              This time I used the super glue gel as suggested by Tony. This is indeed much easier to work with! It does not run away and does not immediately stick to everything.
              I also prepared the contact surfaces on both gears using a very fine sandpaper (P2000) hoping that will make the glue bond better (not sure it is needed, but maybe it helps).

              Comment


                #8
                I just got my order in this week (I ordered 5 pieces of each) and hope to a trial soon, I'm excited!

                Now to find a replacement for the last gear, which shears apart due to age of the plastic and the force on the gear. This particular gear turns the shaft on which the outside gear is mounted, so the inner tube of the gear is not round, this will be a challenge to find

                Comment


                  #9
                  That will be hard to find indeed. But this post describes a nice workaround: https://www.flipclockfans.com/forum/...al-gear-repair
                  I applied this once using the tube from a bottle pump dispenser (see photo).
                  As an alternative I was thinking about using my favourite bodging material Gorilla plastic. This will create a perfect fit on the shaft and is very strong. Attaching it to the gear though is a bit more difficult. I doubt whether a glue bond is strong enough, but if you make some grooves or holes in the gear you could connect the gorilla plastic and the gear mechanically.
                  I think the tube fix is much easier.

                  Comment


                    #10
                    The tube fix might indeed be a good workaround, I had forgotten about that post. Mind you, it does not happen often that this gear shears, but it can be annoying when it does.

                    Comment


                      #11
                      Originally posted by flipoclock View Post
                      I just got my order in this week (I ordered 5 pieces of each) and hope to a trial soon, I'm excited!

                      Now to find a replacement for the last gear, which shears apart due to age of the plastic and the force on the gear. This particular gear turns the shaft on which the outside gear is mounted, so the inner tube of the gear is not round, this will be a challenge to find
                      Youtube video please, im missing them

                      Comment


                      • flipoclock
                        flipoclock commented
                        Editing a comment
                        Hi! Youtube video of what? Are you missing any gears?

                      #12
                      I thought you done the flip clock fans youtube videos, and thought you may do an assembly video of these newly sourced gears, i have created a resin copy of this gear and it was running great, the clock has been switched off for a few months so i must run it again to see if it still works, i probably made 100 gears before i got one to form all 40 teeth

                      Comment


                        #13
                        I think you mean why no new videos from Mackey in 6 months? are you okay Mackey? we do miss you.

                        Comment


                          #14
                          Originally posted by tonyofthelord View Post
                          I think you mean why no new videos from Mackey in 6 months? are you okay Mackey? we do miss you.
                          Yes thats exactly what i ment

                          Comment


                            #15
                            I did my first repair of a US type clock, 110v/60hz with this gear and can confirm that it works like a charm! It has been spinning perfectly for about 12 hours now and still going strong.

                            I connected the two gears with a drop of superglue. I put the 1st gear on the drill bit I used to drill out the hole, put on some superglue and pushed the 2nd gear onto the drill to connect the two gears. I figured that even if it were to get stuck to the drillbit, I would be able to push it off, but it did not get stuck at all.

                            Comment

                            Working...
                            X