


I recently acquired an RCA RWD436R. I think this is a beautiful clock - the design, the colours, the component parts, and the construction are all fantastic.
It's relatively easy to get into; 2 screws. A plastic screw on the base, a machine screw in the middle of the back. You don't need to remove any knobs or switches to get inside; the snooze button on the top does not need to come off to open the case, and don't try to pull it out. Once you've removed those 2 screws, it helps to gently lever the top edge of the white plastic insert slightly forward with your fingers, all the while pushing gently underneath the clock near the strain relief. You need to push the strain relief in enough so that it goes inside the case and clears the plastic lip. You should then be able to slide the whole assembly out of the outer case. To separate the radio board and clock mechanism from the white facia plate, there are 4 easily accessible screws for both. Note that when you remove the radio board, there is 1 screw longer than the others and that goes at the bottom corner nearest the power capacitor, which is huge and gives off a lot of heat when powered up. I'd be very careful around that capacitor as it's rated at 160v so will give you a serious shock. I made some of these https://www.ifixit.com/Guide/Constru...arge+Tool/2177 to give me a little more confidence that I wasn't going to fry myself! All the knobs on the front facia need to come off to separate the radio board and clock mechanism, and they just pull off by applying firm and gentle pressure.

The snooze button has a couple of spring tabs that you can release from inside the case. Be careful not to lose the spring underneath it as it could pop out when you remove the button.

The speaker wire is held in place with a little metal loop on the bottom corner of the radio board. I wanted to remove the speaker to clean the case properly, but I found that it was well and truly stuck to the case. Not sure if that was by design, or just degradation over time, but as I pulled gently on it I could tell it was separating the metal speaker surround from the paper cone, with the cone remaining firmly stuck to the case. So I backed out of that. It was in the area where the metal clamp holds it to the case, so fingers crossed it doesn't affect the sound quality at all - I couldn't notice anything once reassembled so I think I dodged a bullet there.

The case is surprisingly well ventilated, perhaps due to the heat from the transformers/capacitor? I used a nail tee (pointy q-tip) to clean the tight spaces with soapy water. The lady's beauty section at the drug store provides some great tools and good prices for stuff like this. A blusher brush is great for dusting delicate items like flip tiles too. I did learn you have to be very gentle with cleaning the case on these. The wood effect on polystyrene you see on a lot of clocks from this era appears to be brown paint on black plastic, and it will rub off. If you have some particularly stubborn marks, you may have to live with them. I found that by rubbing a little too much with a microfibre cloth and soapy water, I was accidentally rubbing off the brown wood effect. One gentle pass with the cloth seems to be enough and avoids damaging the finish.
This clock shares the copal mechanism with the Wynford Hall NSI-1103, but the latter does not have the snooze mechanism installed. I have noticed this particular mechanism makes a metallic ping as the hour changes, which can be a little annoying if you have the clock next to the bed. I suppose it's a little like the beep 80's wrist watches used to make on the hour. The ping comes from the tab that holds back the hour tile, and you can make the same noise on demand just by flicking the tab. It seems like it has a little too much tension stored in it for a quiet release. Does anyone know if you can silence the ping by slightly adjusting the tab?
I cleaned the clear plastics with a microfibre cloth and soapy water to start with. Always surprising how much dirt is on there even if it looks clean. I then used Meguiars PlastX to polish it up. I again used a nail tee to get to the tight corners and near the painted bits, e.g., the chrome line surrounding the screen.
To get the knobs back on, I found it helped to engage them at a very slight angle with the the curved side of the knob post and stem contacting first. Then apply firm but gentle pressure, and as it just starts to give, straighten it up and push the knob straight on. Starting at a slight angle seems to help spread the 'mouth' on the knob stem so you can get it to slide onto the post more easily.
My radio dial does not light up. Well, there's actually no light inside to light up. Does anyone know if it's meant to be lit? I did notice that there are cut outs and a mounting port at the base of the radio dial, and a corresponding hole on the facia which suggests one could have been installed. Perhaps they planned to and forgot to install it, or maybe another model which shared the case did? I was considering retrofitting one if I can identify a suitable low voltage feed off the radio board.

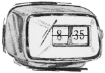
Here it is all reassembled.

A few outstanding things I need to address:
- The clock seems to speed up and slow down a little. I think it does it when the radio is on. Perhaps it's pulling too much power and slowing down the motor? I didn't have any suitable lubricants at the time, so I may give the whirlygig a flush with alcohol and re-lube the mechanism to see if that helps as it may still be a little dirty and sticking. I got some washi tape so I may decorate the plain whirlygig when I have it apart, even though it won't be visible once back together.
- I need to change the neon bulb as it's dim. Are these always an NE2 bulb? It measured about 20mm long and 10mm wide, with about 10mm from should to tip of the bulb. If you used an NE2H, would it be too bright and look odd?
It's relatively easy to get into; 2 screws. A plastic screw on the base, a machine screw in the middle of the back. You don't need to remove any knobs or switches to get inside; the snooze button on the top does not need to come off to open the case, and don't try to pull it out. Once you've removed those 2 screws, it helps to gently lever the top edge of the white plastic insert slightly forward with your fingers, all the while pushing gently underneath the clock near the strain relief. You need to push the strain relief in enough so that it goes inside the case and clears the plastic lip. You should then be able to slide the whole assembly out of the outer case. To separate the radio board and clock mechanism from the white facia plate, there are 4 easily accessible screws for both. Note that when you remove the radio board, there is 1 screw longer than the others and that goes at the bottom corner nearest the power capacitor, which is huge and gives off a lot of heat when powered up. I'd be very careful around that capacitor as it's rated at 160v so will give you a serious shock. I made some of these https://www.ifixit.com/Guide/Constru...arge+Tool/2177 to give me a little more confidence that I wasn't going to fry myself! All the knobs on the front facia need to come off to separate the radio board and clock mechanism, and they just pull off by applying firm and gentle pressure.
The snooze button has a couple of spring tabs that you can release from inside the case. Be careful not to lose the spring underneath it as it could pop out when you remove the button.
The speaker wire is held in place with a little metal loop on the bottom corner of the radio board. I wanted to remove the speaker to clean the case properly, but I found that it was well and truly stuck to the case. Not sure if that was by design, or just degradation over time, but as I pulled gently on it I could tell it was separating the metal speaker surround from the paper cone, with the cone remaining firmly stuck to the case. So I backed out of that. It was in the area where the metal clamp holds it to the case, so fingers crossed it doesn't affect the sound quality at all - I couldn't notice anything once reassembled so I think I dodged a bullet there.
The case is surprisingly well ventilated, perhaps due to the heat from the transformers/capacitor? I used a nail tee (pointy q-tip) to clean the tight spaces with soapy water. The lady's beauty section at the drug store provides some great tools and good prices for stuff like this. A blusher brush is great for dusting delicate items like flip tiles too. I did learn you have to be very gentle with cleaning the case on these. The wood effect on polystyrene you see on a lot of clocks from this era appears to be brown paint on black plastic, and it will rub off. If you have some particularly stubborn marks, you may have to live with them. I found that by rubbing a little too much with a microfibre cloth and soapy water, I was accidentally rubbing off the brown wood effect. One gentle pass with the cloth seems to be enough and avoids damaging the finish.
This clock shares the copal mechanism with the Wynford Hall NSI-1103, but the latter does not have the snooze mechanism installed. I have noticed this particular mechanism makes a metallic ping as the hour changes, which can be a little annoying if you have the clock next to the bed. I suppose it's a little like the beep 80's wrist watches used to make on the hour. The ping comes from the tab that holds back the hour tile, and you can make the same noise on demand just by flicking the tab. It seems like it has a little too much tension stored in it for a quiet release. Does anyone know if you can silence the ping by slightly adjusting the tab?
I cleaned the clear plastics with a microfibre cloth and soapy water to start with. Always surprising how much dirt is on there even if it looks clean. I then used Meguiars PlastX to polish it up. I again used a nail tee to get to the tight corners and near the painted bits, e.g., the chrome line surrounding the screen.
To get the knobs back on, I found it helped to engage them at a very slight angle with the the curved side of the knob post and stem contacting first. Then apply firm but gentle pressure, and as it just starts to give, straighten it up and push the knob straight on. Starting at a slight angle seems to help spread the 'mouth' on the knob stem so you can get it to slide onto the post more easily.
My radio dial does not light up. Well, there's actually no light inside to light up. Does anyone know if it's meant to be lit? I did notice that there are cut outs and a mounting port at the base of the radio dial, and a corresponding hole on the facia which suggests one could have been installed. Perhaps they planned to and forgot to install it, or maybe another model which shared the case did? I was considering retrofitting one if I can identify a suitable low voltage feed off the radio board.
Here it is all reassembled.
A few outstanding things I need to address:
- The clock seems to speed up and slow down a little. I think it does it when the radio is on. Perhaps it's pulling too much power and slowing down the motor? I didn't have any suitable lubricants at the time, so I may give the whirlygig a flush with alcohol and re-lube the mechanism to see if that helps as it may still be a little dirty and sticking. I got some washi tape so I may decorate the plain whirlygig when I have it apart, even though it won't be visible once back together.
- I need to change the neon bulb as it's dim. Are these always an NE2 bulb? It measured about 20mm long and 10mm wide, with about 10mm from should to tip of the bulb. If you used an NE2H, would it be too bright and look odd?


Comment