Welcome!

Welcome to the forum for collectors, restorers and fans of flip clocks. Please Sign Up if you would like to take part.

By the way, signing up is free..

Announcement

Collapse
No announcement yet.

Sony TFM-C650W

Collapse
X
 
  • Filter
  • Time
  • Show
Clear All
new posts

    Sony TFM-C650W

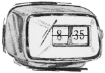
    I got this Sony TFM-C650W cheap on eBay because the clock was stopped. It was severely yellowed from UV exposure and I restored the case using Salon Care 40.
    It is a very well built clock radio with lots of bits of foam and velvet tape to prevent any plastic on plastic contact that could cause noise. The wiring was all meticulously routed, secured and tied. The alarm dial has a lamp that lights when the alarm is set. The radio dial lights when the radio is turned on manually, but not when alarm is sounding or when using the sleep timer.
    This model has a seconds wheel that is connected to the motor gearbox. This feature is cool, but adds complexity and serves no real practical purpose. It is a Copal GC-1379 movement made in 1974. The old alcohol bath got the clock going, but it is not perfectly silent.
    The neon clock lamp was still bright enough to light the clock but I replaced it for good measure.
    The alarm dial and radio dial use little green incandescent lamps. I found that "Grain of Wheat" lamps used in model railroading fit, but are a little dim. I will have to crack clock open in the future and check the voltage for the lamps with a multimeter.

    Before restoration: Click image for larger version  Name:	IMG_3251.jpg Views:	1 Size:	160.1 KB ID:	2854


    After restoration: Click image for larger version  Name:	IMG_3391.jpg Views:	1 Size:	155.1 KB ID:	2855


    Before restoration: Click image for larger version  Name:	IMG_3253.jpg Views:	1 Size:	140.6 KB ID:	2856


    After restoration: Click image for larger version  Name:	IMG_3390.jpg Views:	1 Size:	140.0 KB ID:	2857


    Jeremy
    Last edited by Jeremy; May 4, 2017, 11:29 PM.

    #2
    Here are the "Grain of Wheat" incandescent bulbs. I think the technical size of these bulbs is T1-1/4
    The bulbs are available in various voltage.
    Click image for larger version  Name:	IMG_3266.jpg Views:	2 Size:	160.8 KB ID:	2859
    Click image for larger version  Name:	s-l1600-5.jpg Views:	2 Size:	217.2 KB ID:	2860


    Jeremy
    Last edited by Jeremy; May 4, 2017, 11:32 PM.

    Comment


      #3
      I have been testing the 'salon care stuff' on a clock which was too 'ugly/discoloured' to use anyway, but have been getting mixed results... Does it really depend on how much of the stuff you apply? I guess so.... How do you apply it really evenly? Is there a trick to do that?

      Your input/help is much appreciated!

      Comment


        #4
        You need to apply a nice coat of Salon Care and then give it LOTS of direct sun exposure. I smeared it on with a gloved hand, and would occasional agitate it through the bag during the sun exposure. I did a total of three five hour sun sessions. You need to wash and apply fresh Salon Care for each session.

        Jeremy

        Comment


          #5
          I have just let it sit in the stuff for days, each day reapplying, and sometimes washing off and reapplying new stuff. The sun works but I also found that regular bulb (incandescent) works well. I have actually started to wonder if it isn't the light but the low grade heat. It'd be interesting to do a study but who's got the time for that!
          Supposedly a UV bulb is the best, but if you're patient it will actually work with just ambient light. I got some of the Salon Care 50 and it definitely works quicker. Just have to be patient no matter which kind you use (30 also works).
          ~ Mackey Site Administrator
          If you have any questions/comments Contact Me
          If you're not a member, you should consider joining!

          Comment


            #6
            I tried one other (junker) clock inside, under artificial light, but with room temperature, this seemed to work ok.... For the other clock (which is supposed to be put back together afterwards as a 'showpiece'), I gave it 2 sessions by now and it is looking a whole lot better.

            It was originally dark grey, but had turned almost brown in some places (due to smoke perhaps?). I will try with one more session, although I have to say that I am already rather pleased with the result...

            Comment


              #7
              My understanding is that its the UV light that causes the molecular bonds in the plastic to become unstable. In a normal environment the resulting weak molecular bonds result in oxidation (browning). By weakening the molecular bonds with the plastic covered in hydrogen peroxide it de oxidizes. The best source of broad spectrum UV is the sun.

              Jeremy

              Comment


                #8
                What I've heard it that many of these old plastics used bromides in the plastic as a flame retardant. " the brominated flame retardants (which were added to the plastic when it was a masterbatch) migrate to the surface of the plastic and attracting oxygen molecules which become attached by a co-ordinate bond." Bromine molecules are susceptible to ultra-violet light, in that chemical bonds involving bromine molecules can become destabilised if irradiated by UV light. Supposedly, the H2O2 treatment help speed up this process.
                ~ Mackey Site Administrator
                If you have any questions/comments Contact Me
                If you're not a member, you should consider joining!

                Comment

                Working...
                X